admin

Set up email or sms/text

Email*

The email channel is a time-proven method of sending review invitations, and Review My Company makes it easy for you to send your invitations over email. We use the same enterprise-grade email solution used by Uber, Spotify, and countless other companies to improve your email deliverability.

Templates

Use our template builder to set up your own email invitations, or set up your own custom templates by using HTML/CSS. You can use variables to inject variables such as the customer name, order ID as well as custom variables that you can provide us for each given customer.

We make it easy for you to A/B test which templates are delivering the best results – you can simply set up your trigger to run two or more templates simultaneously. You’ll then be able to see high-level metrics such as click-through rates to double-down on the template that performs best.

Unsubscribe

Add an unsubscribe link to all your emails by adding the variable {{unsubscribe_link}} to your email, which will be populated dynamically for every email that gets sent.

Subject lines

Similar to Templates, you can also set up your own subject lines and use variables to customize them for each customer. Subject lines can also be A/B tested to improve overall open rates.

Looking for inspiration for your subject lines? How about one of these:

⭐⭐⭐⭐⭐ How many stars would you give us?

{{name}}, we'd love to hear what you think!

Text/SMS*

Depending on your business and the customer data you have at hand, sending review invitations by SMS could be a great way to ask for reviews. We use the same enterprise-grade SMS solution used by Lyft, Nordstrom and countless other companies to send your SMS invitations.

Templates

You can setup your own custom templates to be used when you send your review invitations. Use variables to inject customer information such as the customer name, order ID as well as custom variables that you can provide us for each given customer.

We make it easy for you to A/B test which templates are delivering the best results – you can simply setup your trigger to run two or more templates simultaneously. You’ll then be able to see high-level metrics such as click-through rates to double-down on the template that performs best.

Need inspiration for your template? How about this one?

Hi {{name}}! If you like {{company_name}} could you click the link below and leave us a review? Thanks we really appreciate it :) {{review_us_lp}} 

Set up email or sms/text Read More »

Add customers from your dashboard

You have two options when adding customers from your dashboard: adding them one-by-one, or adding them in bulk by uploading a CSV file.

Add customers one-by-one

To add a single customer, simply click ” Send Invites” located on your admin dashboard. Next, enter the customer’s name and email address or name and phone number depending on the invitation channel that you would like to use. Once the details are provided, select the campaign that you would like to use to add the customer to a campaign. You can also view the schedule and the preview of the messages using the “Preview Invitation” button.

Add customers in bulk (CSV)

Adding customers in bulk is useful when you have > 10 customers, or are uploading customer lists on a regular basis. You can create a new customer list by visiting Customers and then Customer lists in your menu.

You will be asked for:

  1. A name for your customer list

   2. Uploading your CSV file

You’ll now be asked to select and upload your CSV file, and then click Next. Your file will be uploaded and parsed, and you will see how many customers have been identified. You will now be asked to match the columns in your CSV to the fields on our side – customer ID, First Name, Last Name, Email, and Phone.

Make sure to upload your CSV in UTF-8 format for maximum compatibility.

3. Matching the columns in your CSV to fields in Review My Company (such as
         an email)

Pro-tip: Use the following headers when uploading your customers via CSV.

email_address, phone_number, first_name, last_name, shortname, phone_country

The “Your Data” column will show the columns available in your CSV file, so make sure to match them to the relevant fields on the left to ensure a successful upload. Once you’re happy, click Next and then Import to upload your customer list. These customers will now be available on your customer list.

     4. Confirm the import to start the import process

To send a review invitation to the customers on the list, click the Send Invites button on the upper part of the dashboard then select Customer List. You will see a drop-down where you can search for the customer list that you have just added. Select your preferred list then choose the campaign that you would like to use for your invites then hit the Send Invitation button.

Add customers from your dashboard Read More »

Get reviews from the review landing page

Your Review Us landing page is built to generate more reviews for your business, with an easily shareable URL that you can provide your customers. You can setup this landing page by visiting the Landing page and then Review Us page in your Review My Company menu.

You will see the following options:

Review distribution settings

Here you can set the order on how the review sites will be shown – the higher a site is placed in the list, the higher the site ranks. This is also where you can enable or disable a review site from being added as an option to your Review Us landing page.

Funnel

This option allows you to select how your customers are shown your review sites – either they are shown directly (Review Sites funnel), or they can be shown based on customer satisfaction (Thumbs, Stars, and Faces funnel).

Importantly, the customer will always see the option to review your business even if they click a negative customer satisfaction option outlined below, to stay in compliance with review site terms and conditions.

Big buttons

This option shows the review sites you would like reviews on directly.

Thumbs

This option shows thumbs up and thumbs down options – your review sites are shown directly if the customer clicks thumbs up, and you can take private feedback if the customer clicks thumbs down.

Stars

This option shows stars from 1 – 5 – your review sites are shown directly if the customer clicks 4 or 5 stars, and you can take private feedback if the customer selects 1 to 3 stars.

Faces

This option shows happy, neutral or sad faces – your review sites are shown directly if the customer clicks the happy face, and you can take private feedback if the customer selects a neutral or unhappy face.

Widget

Showing off your reviews is no longer limited to your website. You can now add a review stream on your landing page and anyone who will visit your Review Us page will see what your customers are saying about you. 

Custom Fields

Do you want to gather more details when a customer fills out the private feedback form? The custom fields is where you can adjust the information that your customer needs to fill out every time they give you a negative or neutral score. You can also add more questions should you wish to gather more details.

Advanced Settings

You can now customize your landing page design to match your brand. You can use the Advanced Settings to directly edit the HTML and CSS of your landing page.

Customizing your landing page

You can edit your landing page (setting text, uploading a logo, etc.) by visiting the landing page directly – you will see a blue pencil icon in the top left corner.

When this icon is clicked, it activates an editor on the page which allows you to make changes directly on the page. If you’re happy with the changes, click the green tick-mark, which will make those changes live.

Get reviews from the review landing page Read More »

Add customers from the opt-in landing page

The Opt in landing page makes it possible for your customers (or employees on their behalf) to opt in to receiving review invitations from you, for example from a kiosk in your store. You can setup this landing page by visiting Landing page  in your Review My Company dashboard.

To setup your opt in page, you will need to have a campaign – your customer will get added to the campaign once they are opted in. This allows you to set a delay on the review invitation, reminders and more options.

Authentication

You can enable authentication on the opt-in page, which requires visitors to input a username and password before inputting customer information. This is useful if you have employees inputting information and don’t want the public to be able to do so.

These credentials typically only need to be input once, as they get saved for future visits by most modern browsers.

CSV upload

Enable the CSV upload option to be able to upload a CSV file of customers directly from the opt in page, for when you need to opt in more than one customer at a time.

For the sake of simplicity, we require the file to use a standard format as follows:

Pro-tip: Use the following headers when uploading your customers via CSV.

email_address, phone_number, first_name, last_name, shortname, phone_country

Editing the page

You can edit your landing page (setting text, uploading a logo etc.) by visiting the landing page directly – you will see a blue pencil icon in the top left corner.

When this icon is clicked, it activates an editor on the page which allows you to make changes directly on the page. If you’re happy with the changes, click the green tick-mark, which will make those changes live.

Add customers from the opt-in landing page Read More »

Set up a campaign

Campaigns can be setup to run a drip campaign with review invitations to your customers, by email and/or SMS. Once a campaign is setup, you simply add customers to it from one of several places:

  1. Opt-in landing page
  2. Dashboard

How campaign works

Creating a campaign

To create a Campaign, visit Invitations from the menu and then select Campaigns. The campaign is what sends out the review invitation with your given criteria. Click New Campaign to start setting this up.

These are the steps:

1. Set your campaign details

Use a memorable name so that you can identify it later. 

Next, is to set up your campaign settings such as the number of invites you want to send daily and the invitation schedule so you don’t have to send the invites too early or too late in the day.

2. Setup the review invitation

You now have the option to set a Delay and Throttling:

Delay

The number of hours after which you wish to send your review invitation after the event creation

Throttling

Prevent sending out multiple review invitations within a given time period (in hours) should we receive multiple events

Next, you need to select which channel to use to send out your review invitations – email and/or SMS. For email as an example, you can set one or more subject lines and templates to use, which will run them in parallel. As an example, if you set two templates, 50% of your customers will receive one and 50% the other. This is a great way to A/B test which template is generating the best result.

For more information about this, consult our documentation for your selected channel.

3. Setup the review invitation reminder(s) (optional)

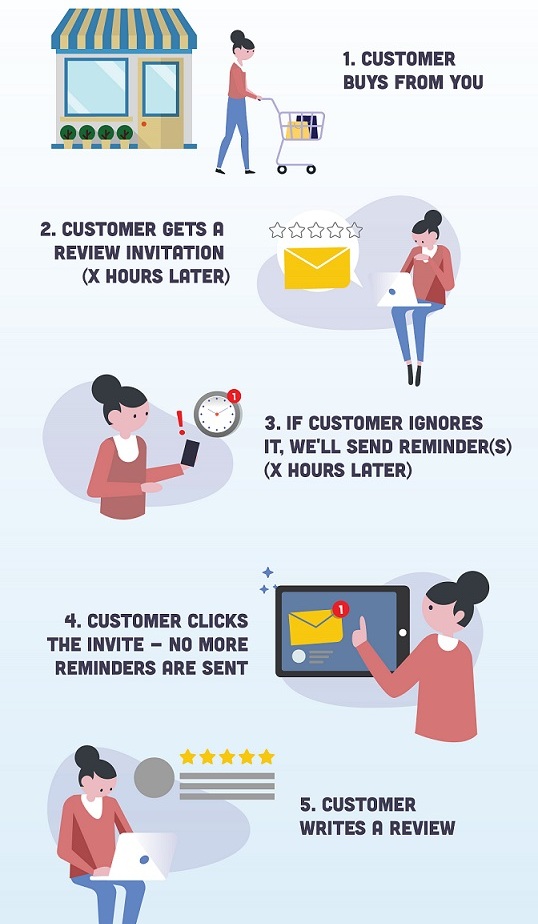
Next, you can optionally setup review invitation reminder(s) to be sent a given amount of hours after the previous contact, also with given a template(s) and subject line(s). Reminders are sent when your customers don’t click the unique links in the emails we send them – once they click, we stop sending reminders.

Once you’re ready to save your Campaign, click Create, which will start scheduling review invitations as you add customers to it.

Set up a campaign Read More »

Introduction to increasing reviews

The best way to consistently generate new reviews is to ask your customers for them – it’s that simple! When doing so, we recommend:

  • Making it as simple as possible for the customer to write their review
  • Sending friendly reminders to follow up

Here is a brief breakdown of the process we follow:

Read on to learn more about each step of this process!

________________

1. Add your customer information

We naturally need your customer information in order to send them a review invitation:

  • Name
  • Email address
  • Phone number

To make this process as easy as possible, we offer several different ways of providing this customer information:

a) Opt-in landing page

The opt-in landing page is a dedicated landing page which is accessible from a unique URL, that you can share with employees and customers to opt them into receiving review invitations.

You can use this page to submit customers one-by-one or in bulk by uploading a CSV with this information.

b) Dashboard

You can also add customer information directly in your dashboard, by using the Send invites dropdown in the top right of your menu (one-by-one or in bulk).

2. Review invitation is sent

Once we have your customer information, we’re ready to send off your review invitation.

Add the customer to a (drip) campaign

By adding a customer to a campaign, you can adjust settings like:

  • Delaying the invitation by n hours
  • Setting a limit on the number of invitations that you can send daily
  • Scheduling your invites to be sent out based on your customer’s timezone
  • Scheduling reminders if the customer doesn’t click the initial invitation

Your invitation will be sent by email and/or SMS, depending on your preference and the customer information provided.

3. Customer clicks the invitation

The invitation is received by your customer, and they click it.

4. Customer is taken to the landing page

We’ll take them to your Review Us landing page, which is a landing page that is dedicated to review generation – it’s the only call-to-action on the page!

Here you can set up a funnel, and adjust which review sites you want to show. You’ll want to give the user some options of review sites, so they can select their favorite or most convenient site.

5. Customer writes a review

This is the best part – when you receive a review ?The review goes live, it’s synced into your dashboard and we send you a review notification – win!

Introduction to increasing reviews Read More »

Managing your competitors

You can use Review My Company to monitor your competitors’ reviews, in much the same fashion that we monitor your reviews. You can setup your competitors by visiting Configurations -> Competitors.

Creating a competitor

On this page, you can click the green + New competitor button to create a new competitor and give it a name. Once created, you’ll be asked to add review sources for that competitor, and you’ll notice how your account is scoped to that competitor.

You can switch between competitors, locations and your main account from the dropdown in the top-right, and your competitor dashboard will only show you reviews, review sources and more for that competitor.

Deleting a competitor

Once deleted, all data for that competitor will be permanently and irrevocably deleted

To delete a competitor, visit your Competitors dashboard and click the red delete button on the given competitor.

Managing your competitors Read More »

Showing reviews on your site

Use Review My Company widgets to do just that:

  • Display an aggregation of your reviews on your site
  • Stream your latest reviews automatically
  • Show off your best reviews by filtering out the negative ones

To get that setup, simply visit Widgets -> Review widgetsin your Review My Company dashboard, and click Create widget.

Once it’s created, copy/paste the snippet of code to your website and you’ll be all set.

Showing reviews on your site Read More »

Sharing reviews to social media

Sharing your reviews to social media is a great way to generate up-to-date content that is relevant to your brand and your followers. Showing off your latest and greatest reviews also helps build social proof for both existing and potential new customers that are checking out your business.

Use the Reviewsmenu in your dashboard and select Social Sharing to start setting this up. We currently support sharing to Facebook, Google and Twitter.

In addition, our social sharing option now includes the following new functionalities which will definitely help you promote and manage your brand at ease:

  • Sharing to Facebook, Twitter and Google Posts – Gives you the flexibility to choose on which social media site you want to share your reviews. Use the slide button to activate or deactivate this feature.
  • Advanced timing functionality – Allows you to set when and how often your reviews will be posted.
  • More template variables (like review URL) – Provides you easy access in personalizing your post without the need of doing it manually.
  • Exclude reviews without text – Allows you to share more relevant reviews which can help your followers and potential new customers.
  • Post images – Photos can now be uploaded to your social sharing settings which makes your review sharing more personal. The images will be posted together with your reviews on Facebook, Twitter and Google post.

Sharing reviews to social media Read More »